
Onwards to Umbraco 13 and Linux – Part 2
It’s time for the second part of the series taking a look at the recent upgrade of my TV Whirl site from Umbraco 10 to 13, as well as moving it all from Windows to Linux. In the first part I focused on getting the core database and Umbraco upgrade itself out of the way, but that was only a small part of the project. Things get much more interesting once I start layering some of the custom functionality I have in place on top of it, which is what I’m sharing in more detail today.
Part 1 – The Main Umbraco Upgrade
Part 2 – Making Custom Functionality Cross-Platform
Part 3 – Enhancing Sustainability and Performance
Part 2 – Making Custom Functionality Cross-Platform
The TV Whirl site is very heavily dependent upon video content so perhaps unsurprisingly this made up the biggest element of the rework needed during this rebuild. In my workflow video is encoded offline manually into h264/mp4 format and uploaded as a single file to Umbraco back office. However, this is not what gets served to end users as after that several more things happen automatically. The single file is first split up into HLS streaming chunks. For those not up on video streaming, essentially these are small individual blocks carved up from a single larger file. When streaming video in a web browser, these chunks are downloaded on the fly as the file plays back allowing for optimised playback with less buffering, the ability to avoid downloading intermediate blocks if someone wants to skip over some of the video, and also makes doing things like switching out audio tracks much easier.
Generating this segmented video on the old Umbraco 10 site involved a very Heath Robinson approach. A PowerShell script sat on the server which would be triggered by the Umbraco publish event. This script was then responsible for doing a series of tasks:-
- Scanning the /media/ folder on the filesystem for the most recently added .mp4 files
- Running ‘Shaka Packager‘ to generate HLS segments
- Uploading via FTP to the Linux server the generated files so while Umbraco ran on Windows, the video would be streamed out from a Linux server as a CDN only
It was a lot of parts, but it did work. Or at least it worked in the Windows space. However, such a heavy dependency on PowerShell scripts and Windows-only installed software meant it wouldn’t work in a cross-platform world, or one where the generation and serving of files was going to be consolidated on a single server, so a whole new way of tackling this was going to be needed for this to work on Linux as well. But for redundancy it still had to be able to support Windows too, allowing me to transparently switch back to the old hosting if ever needed.
Enter at this point The FFmpeg Project. FFmpeg is a cross platform command line executable for handling the decoding and encoding of just about any video and audio format you can think of, despite the MPEG implications in the name. It’s very likely if you’ve used any free or open source video software on any operating system for about the past 20 years that somewhere in the core of it they’re relying on FFmpeg. FFmpeg itself is usually available globally on Linux environments as something else will likely have already installed it as a dependency, and on the odd occasion it’s not can easily be added in via most package repos. On Windows it tends not to be installed globally, so I also include the Windows .exe files in the root of the packaged project. Meaning a call from c# to ‘ffmpeg’ should then work on either OS. So the real challenge now was how to get Umbraco to talk to this.
A look through Nuget will reveal there are many packages designed to provide friendly wrappers around FFmpeg. And I did try out several of them, with varying degrees of success. Some of them hadn’t been updated to work with .net 8 yet and others were long since abandoned projects. Of those that were functional though, a constant problem I ran into with them was that they only tended to focus on wrapping around the most commonly used functionality of FFmpeg, which for most people is just going to be ‘get an input file, encode it into h264’. If you wanted access to any of the lesser used options of the tool however, the wrappers would usually just provide an overload method to allow you to pass in additional command line switches directly. As HLS chunk generation is one of those lesser used functions, using one of these ‘dedicated’ FFmpeg wrappers would have led to a mess of code where nicely written extension methods would be mixed with ‘raw’ command switches, and when code ends up more difficult to read the usefulness of such abstractions becomes questionable. So I decided to abandon the use of a dedicated FFmpeg wrapper package, and instead moved towards a generic command line wrapper in the form of the CliWrap package. This still abstracts away many of complexities of directly calling commands from c# using the ProcessInfo classes, especially taking into account doing so on both Windows and Linux terminals, and allowed me to then pass in the FFmpeg command in a consistent way.
The resultant code, once again hooked on to the ContentPublishedNotification event came out as follows:-
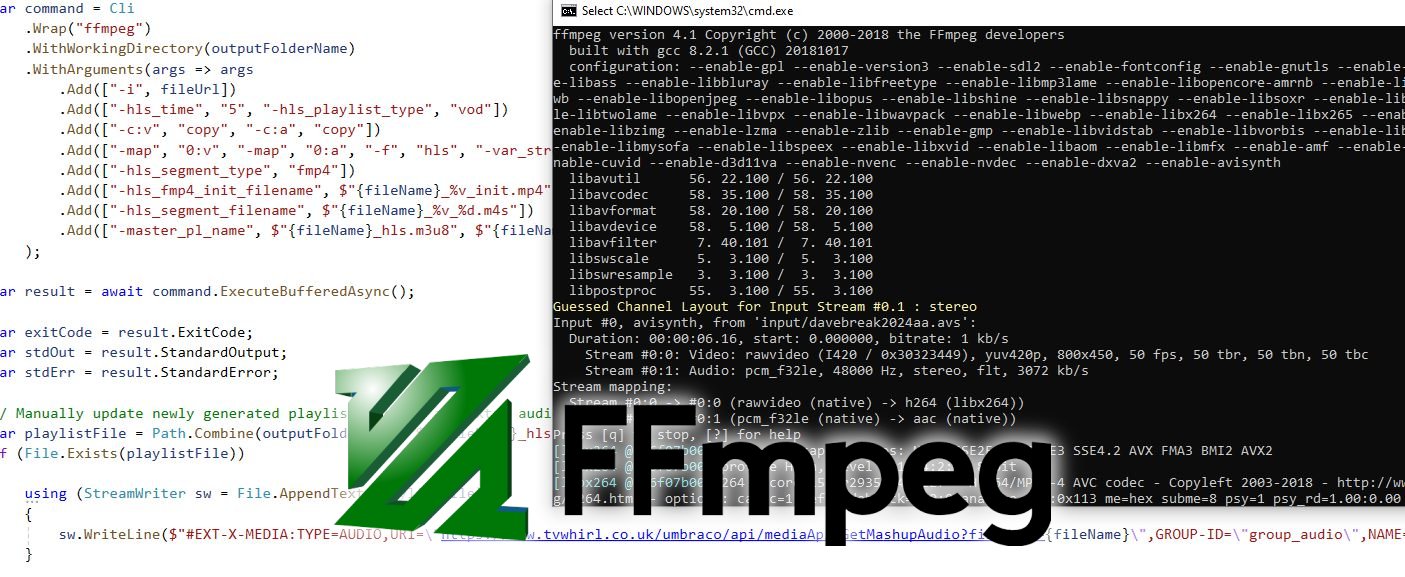
var command = Cli
    .Wrap("ffmpeg")
    .WithWorkingDirectory(outputFolderName)
    .WithArguments(args => args
        .Add(["-i", fileUrl])
        .Add(["-hls_time", "5", "-hls_playlist_type", "vod"])
        .Add(["-c:v", "copy", "-c:a", "copy"])
        .Add(["-map", "0:v", "-map", "0:a", "-f", "hls", "-var_stream_map", "v:0,agroup:audio a:0,agroup:audio,default:yes,language:ENGLISH"])
        .Add(["-hls_segment_type", "fmp4"])
        .Add(["-hls_fmp4_init_filename", $"{fileName}_%v_init.mp4"])
        .Add(["-hls_segment_filename", $"{fileName}_%v_%d.m4s"])
        .Add(["-master_pl_name", $"{fileName}_hls.m3u8", $"{fileName}_stream_%v.m3u8"])
    );
var result = await command.ExecuteBufferedAsync();
Broken down this essentially says:-
- Run ffmpeg
- Take the {fileName} I’ve obtained from the Umbraco upload as input
- Directly copy the video and audio data without recompressing them, mapping the audio track to the first ‘english’ audio language (important as a second audio track comes in to play in a moment)
- Generate 5-second HLS video segments in MP4 format, as well as m3u8 playlists which instruct media players (or web browsers) how to find these and play them
This generates the required series of separated files for the video and audio streams, as well as several playlists helping tie them all together, before dropping these all into another folder on the server outside the main media library. One final separate step in the process then goes back over one of the new files and uses the basic System.IO StreamWriter to add a line of text in to the end of the master m3u8 playlist file, always pointing to a second alternative audio track which can then be chosen on the website player.
sw.WriteLine($"#EXT-X-MEDIA:TYPE=AUDIO,URI=\"https://www.tvwhirl.co.uk/umbraco/api/mediaApi/GetMashupAudio?fileName={fileName}\",GROUP-ID=\"group_audio\",NAME=\"Random Mashup\",CHANNELS=\"2\"");This line is used for a fun little feature on the site player I call ‘mashups’, where I mix the video content with a randomly picked audio stream from another, and always points to the same Umbraco Controller API url to handle this. The filename of the current video file is passed in to the controller method, and as I use unique filenames all the time I can confidently use this as a key to look this up in the Umbraco content cache. Against each file I have the length of the video file stored in seconds within Umbraco too. I can then use this value to look up other Umbraco items with the same length in the background, randomise all the results, before returning a pointer to this alternative audio back to the user. This setup may sound very convoluted for such a simple looking feature, but it means the alternative audio track sent back is always of a similar length to the video clip, avoiding situations where a minute long video could get mashed up with only 10 seconds of audio.
The only remaining small thing to do to make this work was to ensure all these times are accurately stored within Umbraco itself. This is done via another command line call sitting on the ‘ContentSavingNotification’ event this time. FFmpeg comes with a companion tool called FFprobe, that is designed to get information about a video file rather than do any encoding. So when the original .mp4 is uploaded to Umbraco, this command line tool is called to gather the length of the video, extract it from the json block FFprobe returns, and store it against a standard TextBox field in the Umbraco solution for easier lookups later with the following code:-
var command = Cli
    .Wrap("ffprobe")
    .WithArguments(["-v", "quiet", "-print_format", "json", "-show_format", "-show_streams", fileUrl]);

var result = command.ExecuteBufferedAsync();

var json = result.Task.Result.StandardOutput;

var extractedMetaData = JsonConvert.DeserializeObject(json);
var extractedLength = ((Newtonsoft.Json.Linq.JObject)extractedMetaData).First != null ? ((Newtonsoft.Json.Linq.JObject)extractedMetaData).SelectToken("format.duration").ToString() : "0";
savedItem.SetValue("length", Math.Ceiling(Convert.ToDecimal(extractedLength)));
Unlike the earlier encoding command, the eagle-eyed may notice that this extraction command isn’t run async. Running it synchronously seemed to be the only way I could ensure the time value was ready by the time the ‘SetValue’ command was encountered, otherwise an empty value would sometimes be saved to Umbraco. This isn’t ideal, however as the FFprobe command does very little work it returns results very fast, and also as this is an event that only happens occasionally when I add something new to the site, I decided the risk involved with running a blocking sync operation would be minimal.
With all the major video handling code in place, anything else needed to make things work cross-platform tended to be much smaller elements common to any .net core solution. Historically for example I still had several rewrite rules in place, and these were handled using IIS Rewrite Rules in web.config. This again worked fine when you’re hosting on Windows and IIS, but when you’re on Linux they’d be ignored completely. To help with this, Microsoft have included some Rewrite Middleware within .net core that can be accessed using the using Microsoft.AspNetCore.Rewrite namespace in startup/program.cs. This middleware can be used to add new rules from scratch if you’re building a new solution, but also includes a handy ‘AddIISUrlRewrite’ method that can be passed in an XML file and is designed to be compatible with 90%+ of legacy IIS Rewrite rules you may previously have used in web.config. It doesn’t support everything, but I found I was able to get this working by simply moving only the rules into their own XML file, and then making two minor changes to my rulesets. Firstly replacing the unsupported {URL} in any conditions for {REQUEST_URI}, and secondly replacing any occurences of {r:0} in actions with {R:0} – as apparently the rewrite middleware is case sensitive around this whereas IIS Rewrite wasn’t. The middleware generated some surprisingly clear pointers in the exceptions towards these unsupported elements too, so finding and fixing them didn’t take long.
And I’m going to finish on the rewrite rules deliberately here, as some of these rules will become very important in part 3. With all this custom code now in place, I had a fully running Umbraco solution, complete with all the custom functionality I needed over the top. I could technically have launched it all at this point and it would have run fine. But as part of my own personal commitment to the Umbraco Sustainability Challenge, I’d vowed to improve both performance and reduce the carbon footprint of the site with the rebuild too, and that’s what I’ll be focusing on next in the final part of this blog series.

2 thoughts on “Onwards to Umbraco 13 and Linux – Part 2”
Comments are closed.